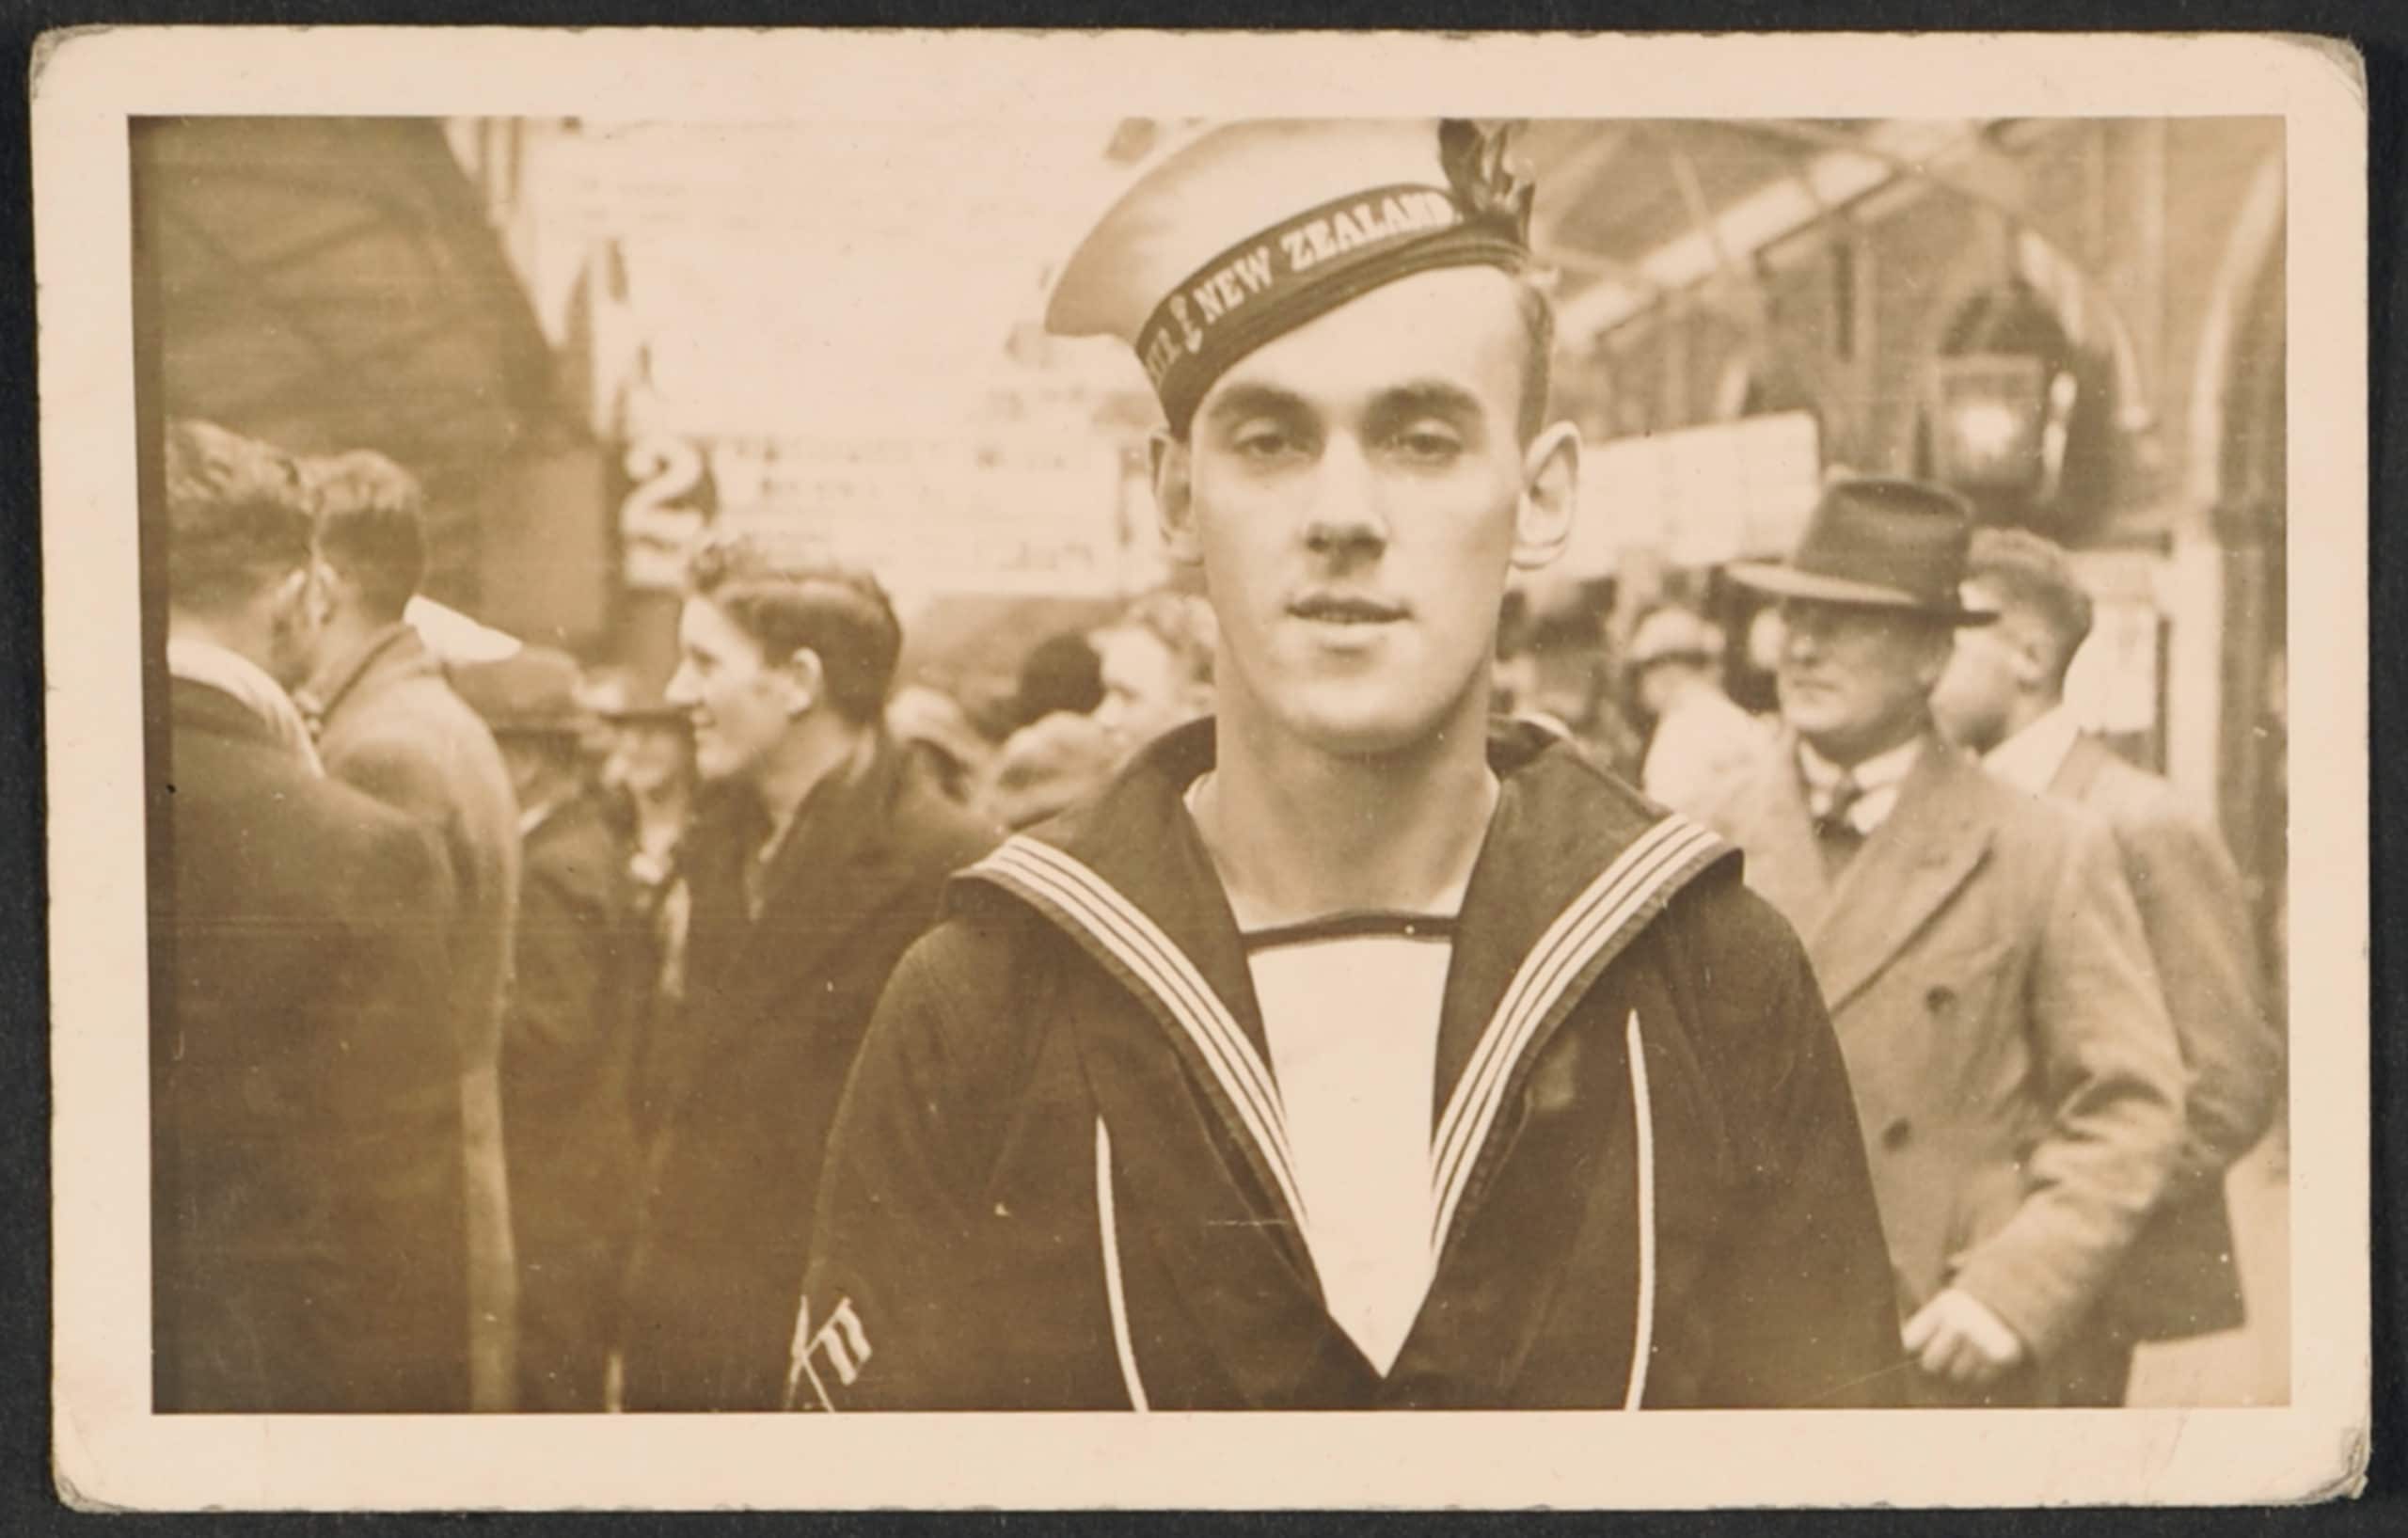
Leading Signalman Campbell Howard Buchanan and his twin sister Chris were born on 7 April 1920 to Joseph and Emma Buchanan of Fox Street, Port Chalmers. Campbell went to Port Chalmers School and left at age 14 to work at Cadbury Fry Hudson in Dunedin before joining the Navy Volunteer Reserve in 1937 (RNZNVR service number 0/7366). By 1940 he was in England serving onboard submarines for a year before joining HMNZS Kiwi (Lt Cdr Gordon Bridson RNZNVR of Auckland commanding) as commissioning crew.
Campbell was just 22 years old when he died on 31 January 1943. His death was the result of wounds he had received two nights previously during the sinking of the Japanese Submarine I-1 by HMNZ Ships Moa (Lt Cdr Peter Phipps RNZNVR of Christchurch commanding) and Kiwi in the waters off the island of Guadalcanal in the Solomon Islands.
Kiwi, Moa, and Tui were 600 ton (900 ton full load) Bird class minesweeping antisubmarine trawler Corvettes. Orders for their construction in the United Kingdom were placed in September 1939 as training ships and they were completed in late 1941. The Corvettes were 51 metres long with a beam of 9 metres and draught of 4.6 metres. Armament comprised a single 4 inch gun, minesweeping equipment, ASDIC (the forerunner of SONAR) and a 20 mm Lewis machine gun. The ships carried a crew of 35 and with their 1100 horsepower steam plant were capable of a maximum speed of 13 knots.
Kiwi received damage in a storm during her delivery voyage from England and was delayed in Boston, USA for repairs. Whilst waiting for the repairs to Kiwi to be completed Moa managed to get the (dry) US Navy to provide and fit a 20 mm Oerlikon for the princely sum of two bottles of gin! The three ships finally arrived in NZ in August 1942, but before the year was out Kiwi and Moa had joined the 25th Minesweeping Flotilla operating out of Tulagi in the Solomon Islands under the direction of US Navy Admiral William F. ‘Bull’ Halsey, Commander US Pacific Fleet.
Not to be outdone by Moa the crew onboard Kiwi set about acquiring and mounting an Oerlikon of their own, as Leading Seaman E.C. McVinnie recalled about an event that occurred in late January 1943:
“We eventually noticed a ship on the beach, an American ship…and we went alongside and stripped it of what we could. One of the things we got off it was this Oerlikon and… the only place we thought of putting it was right on the peak of the bow. One of our crew was a very good chippy and he went ashore to the Seabees. The Americans…supplied him with all the tools he wanted and he chipped out (a)… great big chunk of… some native wood, mahogany or something… They even made us the bolts for us to bolt this right on the peak of the bow.”
That Oerlikon proved to be a godsend only a few days later.
Our story begins in earnest on the particularly dark night of 29 January 1943 with Kiwi and Moa a mile apart, patrolling up and down the coast a mile off Kamimbo Bay at the North West end of Guadalcanal. At 1830 the Japanese submarine I-1 surfaced in the bay, however, on the realisation that the phosphorescent water had revealed her silhouette to Kiwi the I-1 promptly dived.
I-1 was commanded by Lieutenant Commander Eiichi Sakamoto, Imperial Japanese Navy and had sailed from Rabaul five days earlier on a re-supply mission to Guadalcanal. Onboard were rice, bean paste, curry, ham, sausages and a three man crew for a number of Daihatsu landing barges lashed to her hull. At 96 metres long and 2035 tonnes surface displacement the I-1 was larger than both Kiwi and Moa combined.
With a crew of 82 the I-1 was originally fitted with a seaplane hangar but had been modified and now sported a 125mm gun that not only had a greater range than those fitted to the New Zealand ships but also fired a shell more than twice as heavy. The submarine was additionally fitted with a six-pounder stern gun and two machine guns. To cap it off the I-1 was also capable of making 18 knots when surfaced, an advantage of six over her opposition.
Leading Seaman McVinnie was Kiwi’s ASDIC operator and he soon located the dived submarine at a range of 1600 metres. As Kiwi closed to drop a pattern of six depth charges the outline of the submarine could be seen in the phosphorescent water, enabling the depth charges to be placed with a degree of accuracy. This resulted in one of the depth charges detonating near the submarine’s stern with the shockwave damaging the I-1’s port electric motor and flooding her aft storeroom after popping some hull rivets in the vicinity. All of the lights went out and the submarine rapidly fell to the bottom, a depth of over 180 metres, some 100 metres deeper than her test depth of just 80… The uncontrolled impact with the bottom damaged both forward torpedo rooms.
On the surface Moa had been standing off and acting as ASDIC guide whilst Kiwi circled to regain contact and make another depth charge run over the submarine. This combined strategy had proven to be effective as ASDIC contacts tended to be lost when the target passed underneath and were further hampered by the depth charge explosions disrupting the water. Kiwi was unable to regain contact on her second pass over the submarine but was successful on her third and dropped another pattern of six charges.
This second set of depth charges coupled with I-1’s restricted ability to manoeuvre and loss of forward torpedo tubes served to force Sakamoto to surface and attempt to reach Guadalcanal under cover of darkness. His chance of escape was reasonable given that the I-1 could still make 11 knots on the surface despite being restricted to her starboard diesel engine only (due to the damage to the electric motor on her port shaft) and her ability to out gun her adversaries.
Unfortunately the I-1 surfaced within sight of the two minesweepers who turned to close, opening fire with 4-inch star shells for illumination and high explosive rounds for effect. Kiwi’s third H.E. round found its mark, however, I-1 returned fire with her 125 mm deck gun with the result that two shells passed over Kiwi with the “noise like an express going through a tunnel” (Yeoman of Signals J.L.W. Salter, BEM, MiD, RNZNVR RTD). Another three shells passed uncomfortably near Moa causing Moa to call up Kiwi and ask “Are you firing at us?” to the response of “No, that’s the submarine”.
Given that the I-1 was now only 365 metres from Kiwi and beam on, Lt Cdr Bridson decided to ram the submarine. As Kiwi gained speed Moa delivered support by firing star shells to provide more general illumination. Sakamoto realised what was afoot and managed to initiate a turn to starboard resulting in Kiwi striking a glancing blow port side abaft the conning tower. Such was the force of the impact that Kiwi had to use full astern power to pull free from the now holed submarine.
Once clear Kiwi gathered speed and rammed a second time, striking a glancing blow well aft that damaged the port hydroplane. Despite the mounting damage toll the Japanese were by no means ready to give up the fight. Many submariners on deck returned fire with 0.303 rifles in addition to more rounds from the submarine’s main gun, which fortunately all missed.
Kiwi returned fire with as many weapons as could be bought to bear whilst withdrawing from the submarine. The liberated Oerlikon was put to particularly good use clearing the bridge, killing the submarine’s Commanding Officer Lt Cdr Sakamoto in the process. The 125 mm gun crew suffered the same fate and I-1’s main gun finally fell silent.
The accuracy of the fire was greatly enhanced by the illumination provided by Leading Signalman Buchanan at his station on the ship’s signalling lamp, pressed into service as a searchlight. The barges lashed to the submarine’s deck also caught fire and provided additional light. Kiwi’s signalling lamp drew a lot of fire in an attempt to halt its operation and as the corvette closed to ram a third time one of the submariners succeeded in mortally wounding Buchanan, with the high velocity .303 round actually passing through the gun shield. Buchanan nevertheless remained at his post until officially relieved.
Kiwi’s third and final ramming was the heaviest yet, striking the submarine on the port side abaft the conning tower. Such was the force that Kiwi rode right up onto the I-1 and several submariners were flung into the sea. The impact ruptured some of I-1’s oil tanks and as Kiwi once again used full astern power to pull free the submarine was seen to be well down by the stern. The I-1’s First Lieutenant and Navigator (a 3rd dan Kendo swordsman) both unsuccessfully attempted to board the Kiwi with swords in hand.
Kiwi was not without damage herself, with the three rammings serving to not only severely crumple her bow but also render her ASDIC gear unserviceable due to the repeated shock of impact. Her 4-inch gun was also inoperable having become too hot from the repeated firing. Just an hour had elapsed from the first sighting of the submarine and Kiwi now stood aside to allow Moa to take the lead in the chase.
The crew on I-1 had not been idle and managed to not only coax 12 knots out of the one good engine but also put out the fire on the casing. With the 125 mm gun out of action the submarine resorted to the six-pounder mounted aft, to which Moa replied with her 4-inch.
A manoeuvring duel then took place with the submarine attempting to avoid Moa’s fire. I-1’s Executive Officer Lt Koreeda Sadayoshi (later Lt Cdr and CO of RO-115 and CO of the Kaiten base at Hikari) aimed to run the damaged submarine aground before her stern slipped further under the surface. Meanwhile Moa sought to prevent the submarine’s six-pounder stern gun being bought to bear whilst signalling lamps and a steady stream of star shells kept the submarine illuminated. Several of the corvette’s shells were observed to find their target.
The action drew to a close roughly two hours after it started when at 8.40 PM the submarine ran aground on a submerged reef at 09-13S, 159-40E. Moa loitered in the vicinity until dawn when it became apparent that the forward 15 metres of I-1 was protruding from the water at an angle of 45 degrees. As daylight broke shore based Japanese artillery fire forced Moa to move off but not before a submariner was shot off the submarine’s casing and a wounded officer pulled from the sea.
The corvettes had collectively expended 58 x 4-inch rounds resulting in 17 definite hits and 7 probable. The unofficial 20 mm Oerlikons fired 1,259 rounds and a further 3,500 machine gun and rifle rounds were expended. One NZ Sailor (Buchanan) was killed in return for 26 Japanese, including Lt Cdr Sakamoto, the submarine’s Commanding Officer. Despite Kiwi’s bow being stove in, her ASDIC gear out of action and minor damage sustained from enemy gunfire she returned to NZ and was soon repaired. The unofficial Oerlikon was removed before arrival in Devonport!
Kiwi’s Commanding Officer Lt Cdr Bridson was awarded the Distinguished Service Order for his exploits whilst Phipps (later Vice Admiral Sir Peter Phipps, KBE, DSC and Bar, VRD who went on to become the first NZ born Chief of Defence Staff) received a bar to his Distinguished Service Cross. Steward Ernest Barton from Moa was Mentioned in Despatches for his gallantry during the attack (and was himself to be wounded in another action only a couple of days later, receiving the Distinguished Service Medal in the process for remaining at his post until he collapsed).
The Naval Secretary in Wellington sent the following in a letter to Mrs E. Buchanan, 14 Fox Street, Port Chalmers, Dunedin on 31 May 1943:
Dear Madam,
I have been requested by the Minister of Defence to advise you that your son, the late leading Signalman Campbell Howard Buchanan, 0/7366, has been Mentioned in Despatches (Posthumously), in recognition of his gallantry in the action which resulted in the destruction of a Japanese submarine early this year.
I also desire to advise you that the posthumous award of Mentioned in Despatches for gallantry in action is a very high honour, and comes next to the Victoria Cross, these being the only posthumous awards which are conferred by His Majesty for such gallantry
Buchanan was also awarded the US Navy Cross with the following letter from the South Pacific Force of the United States Pacific Fleet, Headquarters of the Commander:
In the name of the President of the United States, the Commander South Pacific Area and South Pacific Force takes pleasure in awarding the NAVY CROSS, posthumous, to:
LEADING SIGNALMAN, C. BUCHANAN, ROYAL NEW ZEALAND NAVAL VOLUNTEER RESERVE for service as set forth in the following
CITATION:
For extraordinary heroism and distinguished service in the line of his profession while serving onboard a corvette which participated in the action against a Japanese submarine near Guadalcanal Island on the night of January 29 and 30, 1943. Leading Signalman BUCHANAN, although mortally wounded, courageously remained at his battle station during the entire action. He skilfully trained a searchlight on the submarine and kept the target illuminated for the guns of his ship. During the engagement the submarine, after being forced to surface by depth charges, was rammed twice {actually three times} and hit several times by the gunfire from his ship. His valorous action, taken with complete disregard for his own safety, contributed materially to the destruction of the enemy, and was in keeping with the highest traditions of the Naval Service”
(Signed) W.F. HALSEY,
Admiral, U.S. Navy
Buchanan was initially buried at Tulagi; however his body was later removed to the NZ War Cemetery at Bourail, New Caledonia, where it remains to this day.
Unlike most accounts of this action the story actually does not end here. Once the Moa withdrew the 55 surviving crew of the I-1 struggled ashore with their current code books but were forced to leave behind various call lists, manuals, old code books, charts and the ship’s log. Given that they were behind enemy American lines the crew tore the code books into small pieces and buried them on the beach in three locations 3 kilometres apart, for fear of highlighting their position if they lit fires in the jungle to burn them.
Five crewmembers from the I-1 attempted to sink the wreck of the submarine on the night of 2 February by exploding two depth charges, however, the explosion was too small to cause any real damage. The crew eventually returned to Rabaul and reported the submarine’s loss which caused much consternation in the Imperial Japanese Navy’s General Staff 10th Department (responsible for communication security). This was due to the submarine carrying not only the current codes but copies of reserve editions due to become active before I-1 returned from its mission.
This meant that until such time as all the I-1 documents could be recovered or destroyed some 200,000 secret documents widely distributed across the Pacific were compromised. Accordingly the submarine squadron issued orders to recover the lost documents from the beach; however, some of the burial sites could not be relocated.
On 10 February eight carrier based Aichi D3A2 ‘Val’ dive bombers (escorted by 28 ‘Zeke’ carrier based and 14 Naval Air Group fighters) bombed the I-1. Just one bomb hit in the vicinity of the conning tower with the result that 1/5th of the submarine remained sticking out of the water.
The following day the I-2 with Lt Koreeda onboard departed the Shortland Islands with instructions to sink the wreck but failed to locate the I-1 in the dark two nights later. A second attempt was made on 15 February, however, once again the wreck could not be found with the result that the compromise of codes was formally announced by Tokyo on that day. The failure to destroy or recover the documents meant that full replacement was now required which took months to effect. This caused many compromised items to remain in service for up to six months.
The Japanese fears were well founded – American divers retrieved a large number of secret documents. These were the first Japanese codes captured during the war and were still extremely valuable (despite some of the codes being changed) as they enabled verification of previous recoveries and the identification of earlier decryption mistakes.
One of the compromised codes was JN-25, forcing the use of a reserve version which was not only simpler (and therefore less robust) but much of the code was already known to the American cryptographers. An automated decoding machine that utilised punched cards could decode roughly 50% of these messages before human intervention was required.
This lead to the decryption of a message concerning Admiral Isoroku Yamamoto, Commander of the Combined Fleet of the Imperial Japanese Navy and mastermind of the attack on Pearl Harbour (and the much less successful Battle of Midway). In an effort to boost Japanese morale after the disastrous evacuation of Guadalcanal Yamamoto decided to make an inspection tour of the Solomon Islands and New Guinea.
The American code breaking operation known as ‘Magic’ intercepted a message numbered NTF131755 that was encoded using the JN25D code and addressed to the commanders of Base Unit No.1, the 11th Air Flotilla and 26th Air Flotilla. The message contained large chunks of text that were unable to be decoded, however, the code groups for a few area designators for satellite airfields near Buin were identified.
A further message intercepted on 13 April detailed the itinerary and revealed that on 18 April Yamamoto would be flying from Rabaul to Ballale airfield on an island near Bougainville in the Solomon Islands. Yamamoto and his staff would be flying in two Mitsubishi G4M ‘Betty’ medium bombers from the 205th Kokutai Naval Air unit whilst escorted by six Mitsubishi A6M ‘Zero’ fighters from the 204th Kokutai unit. He was scheduled to depart Rabaul at 0600 (Tokyo Time) and arrive at Ballale two hours later.
Admiral Chester Nimitz successfully gained approval from the President to intercept Yamamoto. An indirect flight of some 430 miles would be required to avoid detection by radar and Japanese coast watchers, which was greater than the range of the F4F Wildcat and F4U Corsair fighters available to the Navy and Marine squadrons in Guadalcanal. Accordingly the mission went to 18 drop tank equipped P38G Lightening aircraft of the 339th Fighter Squadron operating from Henderson Airfield Guadalcanal, although the likelihood of successfully completing the mission was regarded as remote.
In what was to become the longest fighter intercept mission of the war (and one of only three state sponsored acts of assassination in WWII) the American fighters arrived in position one minute early at 0934 and were readily able to spot the Japanese aircraft. Controversy has raged for years over who actually shot down the plane carrying Yamamoto, with Captain Thomas G. Lampier Jr initially claiming the kill whilst 1st Lt Rex T. Barber now looks more likely to be the one who shot the bomber down.
Irrespective of who pulled the trigger Tokyo radio did not report Yamamoto’s death until a month later, and even so news of his death severely impacted Japanese morale.
The I-1 was removed from the Navy List on 1 April 1943; however, a postscript occurred in 1970 when an Australian treasure hunter in search of valuable metals blew up the bow section of the submarine. Unfortunately his small explosion triggered at least two live torpedoes with the result that the entire bow section was split open. Despite the forward 1/3 of the submarine being extensively damaged the remainder is in relatively good condition and lies in waters ranging from 15-30 metres deep, and remains a popular diving spot for visiting NZ sailors.
The Navy has a number of artefacts from the I-1 including a lamp in the Philomel Wardroom, the 125 mm gun outside the museum and the original track chart of the action.
Campbell Buchanan’s sacrifice is remembered via a framed montage just inside the door to HMNZS Toroa in Dunedin, and the Otago Maritime Society managed to obtain assistance from the 2006 year of the Veteran Community Grants Fund to get a bronze plaque cast. The plaque was unveiled by Rear Admiral Jack Steer, RNZN on ANZAC Day in the aptly named Campbell Buchanan Lane.
Lest We Forget.
Read a letter home from Campbell.
Bibliography:
W.J. Holmes, Double Edged Secrets, By. Publisher US Naval Institute 1979
The Navy in New Zealand An Illustrated History, By Grant Howard, ISBN 0 589 01355 6, Publisher A.H. and A.W. Reed Ltd 1981
Blue Water Kiwis new Zealand’s Naval Story, By Matthew Wright, ISBN 0 7900 0817 3, Publisher Reed Books 2001
Portrait of the Royal New Zealand Navy A Fiftieth Anniversary Celebration, By Grant Howard, ISBN 1 86934 027 2, Grantham House Publishing 1991
Tirpitz and the Japanese-German Naval War Communication Agreement, by Frode Weierund, Cryptolog (Volume 20 Number 3 Summer 1999 Pages 6-10, published by US Naval Cryptographic Veteran’s Association
Death of Isoroku Yamamoto, Wikipedia, http://en.wikipedia.org/wiki/Death_of_Isoroku_Yamamoto
HIJMS Submarine I-1: Tabular Record of Movement, Bob Hackett and Sander Kingsepp 2001, http://www.combinedfleet.com/I-1.htm
La Mort de L’Amiral Yamamoto, Colin Bignell, http://perso.orange.fr/ww2/Yamamoto-fin.htm
Dusting Off… Lest We Forget, By John Neilson, The Rothesay News, Volume 13 Number 6 April 2002 and Number 7 May 2002, ISSN 1171-0950
Royal New Zealand Navy Museum Oral History DLB 0004, Reminiscences with Yeoman of Signals J.L.W. Salter BEM, MiD, RNZNVR (Rtd)
Royal New Zealand Navy Museum Oral History DLA 0098, Interview with Leading Seaman E.C. McVinnie, MiD, RNZNVR (Rtd)
More to explore.

Monowai – Hydrographic Survey Ship
HMNZS Monowai worked as a hydrographic survey ship with RNZN.

A Story of Midget Submarines – The illustrations of Guy Todd
Guy Todd served as an officer aboard midget submarines in WW2.

First Aid at Sea in the Second World War
Medical personnel played a vital role at sea during the Second World War.

Looking back on the Coronation of Queen Elizabeth II
Looking back on coronation of Queen Elizabeth II.

The scuttling of the Graf Spee video
Short video of the scuttling of the Battleship the Admiral Graf Spee.

New Zealand HMS
HMS New Zealand served at all three naval battles of WW1.

80th Anniversary WRNZNS
Celebrating the 80th Anniversary of the Women’s Royal New Zealand Naval Service.

Signing of the Japanese Instrument of Surrender
Japanese Instrument of Surrender was signed on the 2 September 1945.
")
Operation Struggle
Midget submarine XE3 carried out a successful attack on a Japanese cruiser.

Wrens
Brief history of women’s war service in New Zealand Navy.

Images from Battle of the River Plate
Gallery of images from the Battle of the River Plate.

Veteran shares memories
WW2 veteran Brian Breen remembers his time in HMNZS Leander.

Remembering the Battle of Kolombangara
HMNZS Leander saw action in Battle of Kolombangara.

Images Battle of Kolombangara
Images from Battle of Kolombangara of Leander crew July 1943.

Leander
HMNZS Leander saw active service in World War Two.

Women in RNZN Timeline
Key events re women serving in New Zealand Navy.
")
Endeavour Antarctic Tanker
In 1971 HMNZS Endeavour undertook operations in 1971.

The Loss of HMS Neptune
One hundred and fifty New Zealanders perished in HMS Neptune December 1941.

Bruce and William Anderson
Twins Bruce and William Anderson died in HMS Neptune.

Commander Gordon Bridson
LT CDR Bridson commanded HMNZS Kiwi during World War Two.