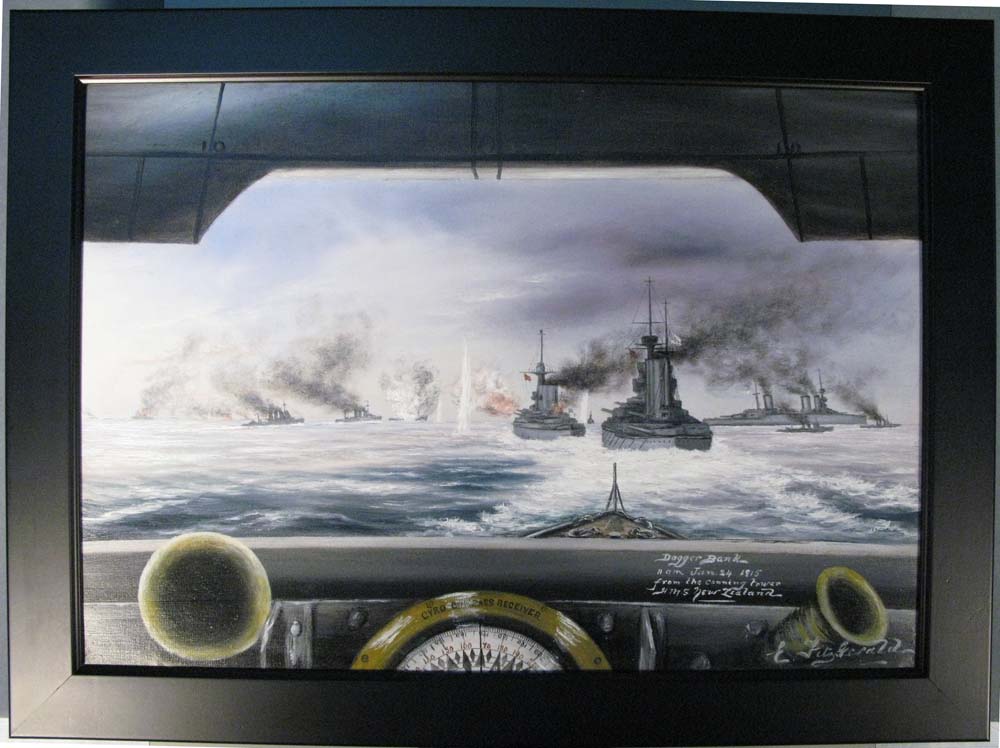
On 24 January 1915 the first clash of battle cruisers took place off the Dogger Bank, in the middle of the North Sea.
This was a badly conducted battle on the British part which resulted in the German armoured cruiser SMS Blücher being sunk and HMS Lion being badly damaged.
On the afternoon of 23 January 1915, the Admiralty code breakers deciphered German signals which indicated a sortie by the battle cruiser squadron.
Admiral Sir David Beatty, commander of the British Battle Cruiser Force was ordered to sea to intercept the German force.
The British were formed into two squadrons, the first comprising HM Ships Lion, Tiger and Princess Royal and the second of HM Ships New Zealand and Indomitable.
Supporting this force were the First Light Cruiser Squadron from Dover and the Harwich Force of Light cruisers and destroyers.
The German squadron comprised SM Ships Derfflinger, Moltke, Seydlitz and Blücherand was also supported by cruisers and destroyers.
At about 7.20am, while it was still dark the cruisers HMS Aurora made contact with the German cruisers and opened the engagement.
As it became light, Admiral Beatty was able to make out the German force in the distance, but was not in a position to cut off The German retreat towards the east.
Thus the engagement turned into a stern chase. The advantage was with the British were able to make about 28 knots, while the Germans 27, but only 23 knots in the case of Blücher.
Additionally Admiral Hipper in command of the German force, had been informed that the British were the 2nd Battle Squadron, over which he had a significant speed advantage.
Lion was hit 15 times by heavy shells, including two simultaneously by Defflinger, one of which put the condenser out of action.
This was a crucial hit because without the condenser being operational, water could not be feed to the boilers and eventually the ship would have to stop.
In spite of this, the battle was going well for the British and it seemed that all the German ships would be sunk.

Blücher was badly damaged and clearly doomed and Seydlitz had received serious damage, but was still in the line.
At this time a submarine periscope was reported and Admiral Beatty later said that he personally saw it.
This resulted in him ordering a 90º turn away from the Germans, which was standard procedure. However this open the range and the Germans drew away.
Lion was by now stopped, without electric power and had all but two signal halyards shot away. Admiral Beatty then signalled “Course North East”, followed by another to “Attack the rear of the enemy”.
Unfortunately these were both made effective together, thereby giving the meaning “Attack the rear of the enemy to the North East”.
Acting on this, his second in command, Admiral Moore, took the remaining four battle cruisers and attacked the poor Blücher which was already sinking.
Beatty transferred his flag to Princess Royal, but it was too late to resume the chase and Admiral Hipper made port safely.
Read the recollections of LT A.D. Boyle serving in HMS New Zealand during the Battle of Dogger Bank.

More to explore.

Metal Ashtray – Artefact Unpacked
During AB Philips time serving in the RN in the Baltic he created this ashtray.

New Zealand HMS
HMS New Zealand served at all three naval battles of WW1.

Roll of Honour World War One
Roll of Honour of New Zealanders who served at sea in WW1.

Wrens
Brief history of women’s war service in New Zealand Navy.

Battle of Heligoland Bight
Heliogoland Bight was first naval battle of World War One.

Armistice through Artefacts
Explore a selection of artefacts related to the 1918 Armistice.

Count Felix von Luckner – Digital Exhibition
A digital exhibition of artefacts relating to Count von Luckner.

Sir James Allen
Sir James Allen – NZ Minister of Defence throughout WW1.

Chief Motor Mechanic Roy Alexander
Roy Alexander participated in the WW1 Zeebrugge and Ostend raids.

James Attwood
James Attwood participated in the Zeebrugge/Ostend raids of 1918.

Captain Alexander David Boyle
Captain Boyle served in all three naval battles of World War One.

New Zealand in the Naval War 1914-1918
Brief history of NZ naval involvement in World War One.

Wybrants Olphert
Olphert joined RNVR for service in Q-Ships

Keith Saull
Rear Admiral Saul saw active service during the Korean War.
Notable New Zealanders in the RNVR, RNR, RNZNVR
Notable New Zealanders who served in RNVR, RNR, RNZNVR.

Motor Boats
Motor launches and coastal motor boats were built to combat submarines.

Count Felix Von Luckner
Count Felix von Luckner came to NZ as a Prisoner of War.

LT CDR William Sanders, VC DSO
LT CDR William Sanders was awarded the Victoria Cross WW1.

LT General Sir Bernard Freyberg VC, DSO**
Lieutenant General Sir Bernard Freyberg served in both world wars.

Lieutenant Commander Frank Arthur Worsley
Lieutenant Commander Frank Arthur Worsley was an accomplished navigator and mariner as well as an Antarctic and Arctic adventurer.