Three small Bird class corvettes ordered in 1939, HMNZS Moa, Tui, and Kiwi were built by Henry Robb Ltd., of Leith, Scotland between 1940 and 1941. This class was based on the design of an experimental Royal Navy minesweeping trawler were the first new ships to enter service with the Royal New Zealand Navy, their principal peace time function was training, and in wartime, minesweeping and escort duties.
Ship Details
Displacement: 923 tonnes
Dimensions: 51.2 x 48 x 9.1 x 4.7m
Machinery: One-shaft reciprocal triple expansion oil-fired, ihp 1100
= 13 knots
Complement: 33-35
Armament:
As fitted 1 x 4” gun (102mm) with gunshield, Minesweeping equipment, ASDIC, 40-42 light depth charges, 1 x twin Lewis mount Added in 1943 – 1 or 2 x 20mm guns
Class Notes: This design was primarily intended for training in seamanship, gunnery, minesweeping, and torpedo work[5]
Background
Three small Bird class corvettes ordered in 1939, HMNZS Moa, Tui, and Kiwi were built by Henry Robb Ltd., of Leith, Scotland between 1940 and 1941. This class was based on the design of an experimental Royal Navy minesweeping trawler were the first new ships to enter service with the Royal New Zealand Navy, their principal peace time function was training, and in wartime, minesweeping and escort duties. After working up in Northern England she went to New Zealand In December 1942, the four ships of the 25th Minesweeping Flotilla, comprising the three ‘Bird class’ corvettes HMNZS Kiwi, Tui, and Moa, with HMNZS Matai as senior ship, had deployed to the Solomons.
HMNZS Kiwi and Moa in Action
The night of 29-30 January 1943 proved eventful for two ships of the 25th Minesweeping flotilla of the RNZN. HMNZS Kiwi and Moa were patrolling one mile apart off Kamimbo Bay at the north-west end of Guadalcanal when the asdic operator obtained a ‘contact’ at 3000 yards with the vessel immediately identified as a submarine . Kiwi at once altered course toward the enemy and increased to full speed to attack with depth charges while the Moa kept her course and acted as ASDIC directing vessel.
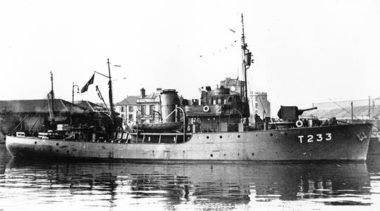
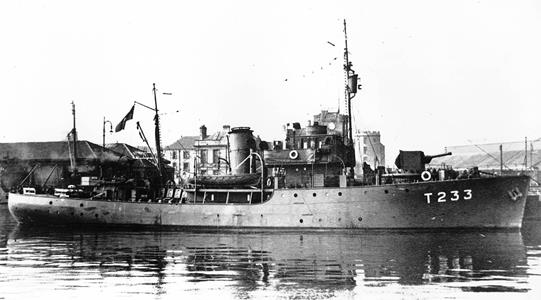
HMNZS Moa (RNZN Museum ABJ0211)
The outline of the submarine could be clearly seen when the Kiwi dropped a pattern of six depth charges, one of which fell in the wake of the periscope. On the next contact, after another pattern of depth charges, the submarine was forced to the surface, its electric motors apparently disabled.[1]
The Japanese submarine I-1 tried to escape in the darkness using her diesel engines under the high land of the island but her efforts were in vain. Kiwi and Moa turned towards their foe firing star shells and high explosives one of which fired from Kiwi found its mark. The submarine replied with her 5.5-inch 140mm gun with two shells passing close over the Kiwi and three very close to the Moa.[2] At this time the Kiwi prepared to ram the submarine on the port side abaft the conning tower. Although she hit the submarine she kept up hot fire with every gun that could be bought to bear.
During the entire battle the Kiwi’s searchlight and signalling lamp were trained on the submarine. The searchlight was controlled by Leading Signalman Campbell Buchanan[3] at considerable risk to himself. Into the action Buchanan was hit and although mortally wounded remained at his post uncomplaining until relieved. He died of his wounds at Tulagi the following day. This act of courage won him the US Navy Cross and a posthumous mention in dispatches. . In a fierce action that lasted more than an hour, Kiwi rammed the submarine three times before I-1 finally struck a reef and was wrecked.
Kiwi rammed the submarine in a close encounter that resulted in the submarine being sunk. Today, the museum has the 5.5-inch gun that was carried by I-1 in its collection.
The next night Moa was again in action, this time with HMNZS Tui, when they encountered some Japanese landing barges. During the engagement, in which Moa sank at least one of the barges, she received a hit on her forward 4 inch gun, which passed through the sighting aperture and exploded, setting fire to the ready-use cordite. All members of the gun’s crew suffered burns and some were wounded by splinters as Leading Signalman J. Salter recalled:
‘Kiwi was out of action after ramming the submarine so we went up with Tui on the next patrol. We ran into a fleet of four barges. We sank one and I think Tui also sank one. One barge fired at us and put a shot through the shield of the gun; it was about an inch in diameter and exploded on the bridge. Ian Fraser had a shell in his arms when a splinter ignited it and it went up in his arms. The flames were higher than the masthead. The whole guns crew were put out of action with very, very bad burns and splinters. The gun was jammed but the gunners managed to clear it the next day. Some American patrol boats came alongside and took our wounded ashore.’
The Sinking of HMNZS Moa
For the first week of April, Moa was engaged in the routine work of patrolling and escort duties around Guadalcanal, being teamed-up with all of the other ships in the New Zealand 25th Minesweeping Flotilla at various times. Air raids remained a feature of this period. The ship spent the night of 5 April in Purvis Sound with a defective generator and went to Tulagi for water on the 6th, remaining there overnight. On 7 April Moa was back on patrol, but due to fuel from a hulk in Tulagi in the afternoon.
On this day, the Japanese launched their I-GO operation to destroy bases and ports of the Allied forces at Guadalcanal, Tulagi, and …. This plan was directed by Yamamoto as a last effort.[4] This had to be delayed because of a large air raid, composed of 98 Japanese aircraft and Moa remained screening outside the harbour until the “all clear” was given. Lieutenant Commander Phipps of Moa then let an American destroyer fuel ahead of him, because it was urgently needed back on patrol. Moa eventually got alongside the hulk and he retired to his cabin. Without warning there was then a further air raid. Moa opened fire with its Oerlikon, but the ship was immediately hit by two 500 pound bombs, one going through the captain’s cabin, missed Lieutenant Commander Phipps by a few feet, continued on through the bottom of the ship, before it exploded. The explosion threw the wardrobe across the door of the cabin and he was lucky not to have been hit by his safe as it hurtled through the air. A second bomb exploded in the boiler room and with the roar of escaping steam from the boilers Moa settled quickly. With shrapnel from the bomb blast in his arms and legs and an ankle broken, Peter Phipps had to climb over the wardrobe that had fallen in front of the door, to get out. On the upper deck he came across Chief Engine Room Artificer Anstis who was lying in the scuppers and tried to lift him, but found that he had not the strength and dropped him. Anstis’ head struck a fuel coupling as he fell, causing a wound that required several stitches. As he later recalled, he was the only one on board to be injured by his own captain.
On the bridge Leading Seaman Jack Salter and Ordinary Telegraphist Bright saw that Signalman Thomas was severely wounded and unconscious. The two fitted him with a life jacket and as the ship sank beneath them, they floated off the bridge, supporting Thomas. Having got off the ship, Lieutenant Belgrave saw that Assistant Steward Molloy was unconscious and going down with the ship and immediately dived under and rescued him. Salter and Bright were later awarded the British Empire Medal.
It only took 4 minutes for Moa to sink with the loss of five lives and another 15 wounded. A total of four ships were sunk during this air raid, including the tanker, which was the prime target.
Moa’s sea boat had got away and with some landing craft rescued most of the survivors. After some time in the water, during which he later recalled being machine-gunned, Lieutenant Commander Phipps found himself lying on the beach with a priest cutting off his oil soaked uniform in order that his wounds could be treated. The wounded were repatriated to New Zealand, Lieutenant Commander Phipps being the last to return, on 26 April.
HMNZS Kiwi
After the action with the I1 HMNZS Kiwi was sent back to Devonport for repairs. After repair, she returned to the Solomon’s area, remaining there till almost the end of the Second World War, returning to Auckland in August 1945 to help in the clearance of the Auckland minefields, going into reserve shortly afterwards. She recommissioned in 1948-1949, 1951-1952, and 1954-1956 for use as a training ship, before finally paying off in 1956. She was sold for scrap in 1964 and broken up shortly afterwards.
Crew Members:
Lieutenant Commander Bridson commanded HMNZS Kiwi during her encounter with the I-1 read about his career with RNZN.
Campbell Buchanan operated the searchlight during the battle despite being mortally wounded he was awarded the US Navy Cross and was Mentioned in Despatches – read about Campbell.
Read a letter from Campbell to his Mother.
[1] S.D. Waters, Official History of New Zealand in the Second World War – The Royal New Zealand Navy. Wellington: War History Branch Department of Internal Affairs, 1956.
[2] Grant Howard, The Navy in New Zealand –An Illustrated History, Wellington: A.H. & A.W. Reed, 1981.
[3] Acting Leading Signalman C.H. Buchanan, RNZNVR Port Chalmers –died Tulagi 31 Jan 1943 – RNZN Posting Record Card held Navy Museum
[4] Yamamoto was killed a few weeks later when his aircraft was shot down by American fighters based on decoded Japanese signals.
[5] R. J McDougall, New Zealand Naval Vessels, Wellington: Government Printer, 1980, p. 55
More to explore.

Monowai – Hydrographic Survey Ship
HMNZS Monowai worked as a hydrographic survey ship with RNZN.

A Story of Midget Submarines – The illustrations of Guy Todd
Guy Todd served as an officer aboard midget submarines in WW2.

First Aid at Sea in the Second World War
Medical personnel played a vital role at sea during the Second World War.

Looking back on the Coronation of Queen Elizabeth II
Looking back on coronation of Queen Elizabeth II.

The scuttling of the Graf Spee video
Short video of the scuttling of the Battleship the Admiral Graf Spee.

New Zealand HMS
HMS New Zealand served at all three naval battles of WW1.

80th Anniversary WRNZNS
Celebrating the 80th Anniversary of the Women’s Royal New Zealand Naval Service.

Signing of the Japanese Instrument of Surrender
Japanese Instrument of Surrender was signed on the 2 September 1945.
")
Operation Struggle
Midget submarine XE3 carried out a successful attack on a Japanese cruiser.

Wrens
Brief history of women’s war service in New Zealand Navy.

Images from Battle of the River Plate
Gallery of images from the Battle of the River Plate.

Veteran shares memories
WW2 veteran Brian Breen remembers his time in HMNZS Leander.

Remembering the Battle of Kolombangara
HMNZS Leander saw action in Battle of Kolombangara.

Images Battle of Kolombangara
Images from Battle of Kolombangara of Leander crew July 1943.

Leander
HMNZS Leander saw active service in World War Two.

Women in RNZN Timeline
Key events re women serving in New Zealand Navy.
")
Endeavour Antarctic Tanker
In 1971 HMNZS Endeavour undertook operations in 1971.

The Loss of HMS Neptune
One hundred and fifty New Zealanders perished in HMS Neptune December 1941.

Bruce and William Anderson
Twins Bruce and William Anderson died in HMS Neptune.

Commander Gordon Bridson
LT CDR Bridson commanded HMNZS Kiwi during World War Two.